We need a better image – this one is terrible – I’ll get one to you
Are you an avid underwater photographer looking for new techniques to help you capture the best shots? Have you heard of Blue lights and wondered how to use them for unique photo opportunities in your favorite aquatic environment? Look no further — this blog post will guide you through the essential processes and strategies of using Blue lights to add a creative flair to your portfolio. We’ll cover everything from selecting the right diving accessories and setting up your shot to practical tips on capturing rotating light beams underwater. With just a little prep work, you’ll take fabulous Fluo photos in no time! So, get ready for the perfect underwater fluorescence photography.
Using blue lights in underwater photography is a technique that is gaining popularity amongst underwater photographers. Underwater fluorescence (fluo) photography allows for the capture of unique and stunning images of aquatic creatures and marine life that are not visible to the naked eye. Dive into the world of fluo photography and explore what it is, what equipment you need, and how to capture the best fluo images.
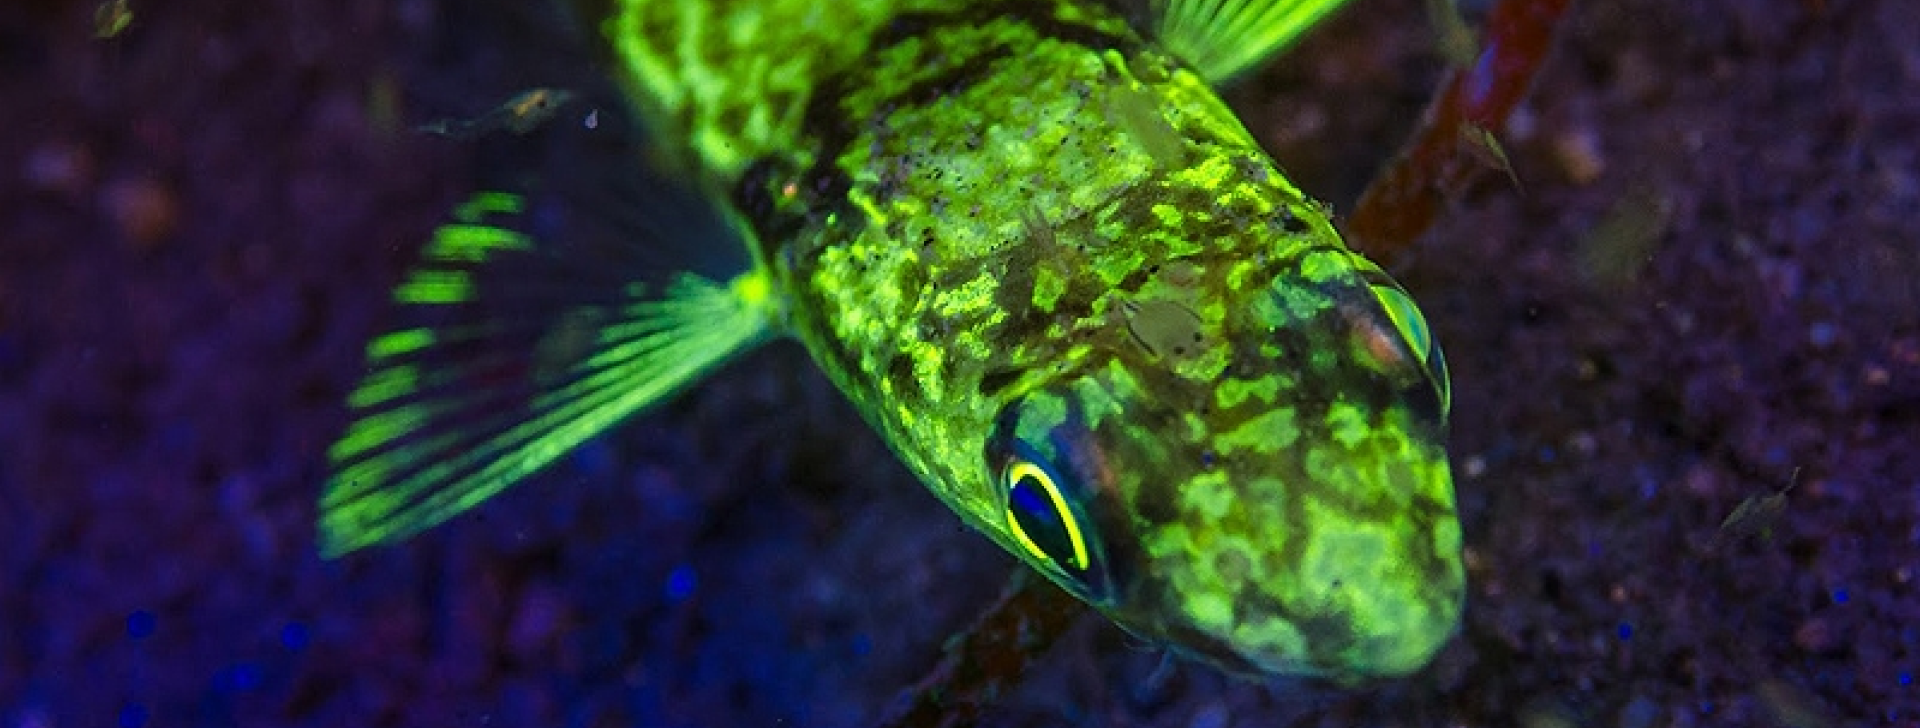
Fluo photography, also known as BIVF (Blue Induced Visible Fluorescence) photography, is a technique that uses blue light to capture images. In underwater photography, Blue light passes through the water layer, revealing the fluorescent properties of marine life, which the human eye cannot see. Fluorescence is the property of a substance to emit light when exposed to the light of shorter wavelength. So when you shine a blue light on a marine organism, some of them exhibit a fluorescent or bio fluorescent response that results in vivid colors and patterns being visible to the underwater camera filters. These fluorescent properties of marine organisms are an essential biological feature that serves various purposes, from attracting mates to hiding from predators.
To capture bio fluorescent images, underwater photographers require special equipment that can detect and record the fluorescent light emitted by marine organisms under blue light. Photographers use blue light to capture the details of stunning marine life.
Capturing bio fluorescent images requires specialized equipment to make the most out of the available light. Here are some of the must-have equipment needed for fluo photography:
Underwater Camera: For fluo photography, you will need an underwater camera such as the Olympus TG-6, Canon G7X Mark III, or Sony RX100VII or similar variants. Of course you can use a sophisticated DSLR as well. These cameras can shoot in RAW allowing for post processing. For DSLR, remember to use the highest quality camera lens to capture detailing.
Underwater Housing: Waterproof housing is essential to protect your camera from water damage when photographing underwater. The housing designed for your camera must be compatible with your preferred lens, port, and extension ring setup.
Barrier Filter: Barrier filters block blue light waves and allow the fluorescent light to pass through, enabling you to capture blue-induced fluorescence. The yellow barrier filter adds an extra effect to the fluoro photography.
Blue Light: Underwater blue lights are necessary to enable the fluorescence effect. Fluo lights can vary in wavelength, with longer wavelengths producing better results. Some manufacturers offer UV lights with 400-405nm wavelength. It has been shown in extensive scientific studies that using UV light is not nearly as efficient as 455nm blue light. It requires nearly 4 times the output power of a UV torchto get the same effect as a blue torch of the proper wavelength. There is also the danger to your eyes to exposure to UV, not to mention, the blinding effects on your target species. Using UV light can literally bind a creature making them vulneratlbe to predators.
Fluo photography requires patience, practice, and a keen eye for detail. With the right equipment and techniques, you can create stunning images that showcase vibrant and beautiful marine life in a whole new way. So, why not plan your next underwater photography excursion, and explore the wonders of Fluo photography?
First and foremost, you will need a yellow barrier filter over your mask. This will block the blue excitation light emitted by your blue light torch(es). Not using this filter will make your eyes hurt after a full length dive and it makes it difficult to actually SEE the fluorescent emission from you target specie.
The camera should have a yellow barrier filter over the lens to filter out the blue excitation light as well. Once the camera and filters are set up, the next step is to take the photos. Finding the right conditions for taking fluo photos is vital; the best condition(s) are darkness….. like when night diving. However, night diving is scary for some, difficult in certain locations because of laws and regulations and expensive if you need a minimum number of people on a boat to go out. Try fluo photography in daylight. Consider, a cloudy day, a bit of depth …say 40 feet/13 meters, on a wall with the sun on the other side, under a ledge, under a coral head. The way to think about is “operate in the shadows” where everything is as dark as possible. Working in daylight eliminates the safety issues and trepidation by some of diving at night.
Advanced processing involves taking the basic processed images and further enhancing them using specialized software. This process aims to reveal the invisible details in the picture that the naked eye cannot see. This of course is a judgement call. I personally ONLY use cropping of my images. Yes, you can use photoshop to make color, saturation and contrast changes but that is kind of like cheating and doesn’t display what is really captured. The fluorescent effect is so dazzling in and of itself, there’s no need to use fakery.
In conclusion, fluo photography is a fascinating form of capturing images using blue excitation light. You can create some truly stunning fluo photos with the right equipment and techniques.
Before using fluo lights and filters in your underwater photography, you must choose the right equipment. Here are some key purchase considerations to keep in mind:
Type of light: Two main types of light are used in underwater fluo photography: ~400nm UV or 455nm blue light. As mentioned above UV has several disadvantages to blue light and while UV will indeed cause creature to fluoresce, blue light will be vastly more dramatic in the effect causeing aquatic organisms to fluoresce, creating stunning and otherworldly images.
Size and weight: Depending on your photography goals, you may need a small, lightweight blue light to fit in your camera bag or a larger, more powerful light. Consider your individual needs when choosing a light. Consider: are you shooting macro, wide angle, video? You need a lot of light to light up the entire reef.
Compatibility: Make sure the blue light you choose is compatible with your camera equipment. Some lights may require adaptors or specialized mounts for fluo diving.
Once your fluo gear are ready, it’s time to start taking photos. Here are some best practices to keep in mind:
Shoot in manual mode: Underwater lighting can be unpredictable, so shooting in manual mode allows you to adjust your settings as needed.
Use a slow shutter speed: Most creatures that fluoresce are coral and relatively stationary targets. A slower shutter speed will alow you to use a smaller (higher number) aperture of the lens. This equates to greater depth of field and better focus .Get close: Water absorbs light and reduces visibility, so get as close as possible to your subject for the best results.
Experiment with angles and lighting: fluo light can create unique and dramatic effects, so don’t be afraid to experiment with different angles and lighting techniques to create stunning images. Dichroic filtered strobes and blue video lights in combination car eliminate shadows and enhance your images.
Try to keep your ISO to about 400-800. Lower is always better but the fluorescent effect is very diminutive and it can be tough to capture with a low ISO.
As you can see, using blue lights for underwater photography can take your snaps to the next level. With a blue light, you can make your shots stand out from a regular, everyday photo by making them brighter and more vibrant. Not only will your pictures stand out from ordinary images, but you may be able to spot some fantastic wildlife that would otherwise remain hidden if it wasn’t for the addition of fluorescent light. Of course, using fluo lights requires significant practice and experience for optimal results. So don’t hesitate to start practicing and experimenting with your camera’s ability to capture fluo images today! You have nothing to lose but time—which will definitely be worth it when you experience the stunning photographs that fluo light helps bring forward in the deep darkness of the deep blue sea.
We need a better image - this one is terrible - I’ll get one to you Are you an avid underwater photographer looking for new t
We need a better image - this one is terrible - I’ll get one to you Are you an avid underwater photographer looking for new t
If you have any questions, comments or suggestions – PLEASE don’t hesitate to contact us.

